

I can make excellent baguettes if I have five hours at home. I don’t need to feel a deep passion for artisan breads, or rely on an abundance of self esteem to make commercial yeast work. Since I have the equipment, know the technique, memorized the mass of the four ingredients in the formula I use, and hopefully didn’t use up my last 500g of all-purpose flour, I can make baguettes happen with minimal effort, often folding the dough between trips to the laundromat, cleaning the apartment, or practicing.
I have a personal rule: It wasn’t a bad day if I made baguettes. When I don’t have any great, challenging, affirming gigs for a few days in a row, I need to make my own victories. Baguettes give me a structure to get smaller tasks done, a practice to build on even through depressed or down days, and a product to take to rehearsals (or just snack on) for about a dollar of ingredient cost.
If you’re reading this out of some productivity voyeurism habit, that’s totally fine! Hopefully seeing these instructions laid out will make it less unthinkable to order the first piece of equipment you need, or jump on another project that’s been nagging you. But nothing makes me happier than when friends tell me they’ve started baking bread at my urging, and I will happily offer advice, troubleshooting, and encouragement. One piece of encouragement: even if they look terrible, you will feel so proud of your first baguettes that they will taste better to you and your friends than most anything you could buy. And once you’ve made baguettes, it’s not nearly as hard to make them again. And again.
Also, I made videos and pictures to go with the guide. It’s really not that hard, I promise!
Equipment
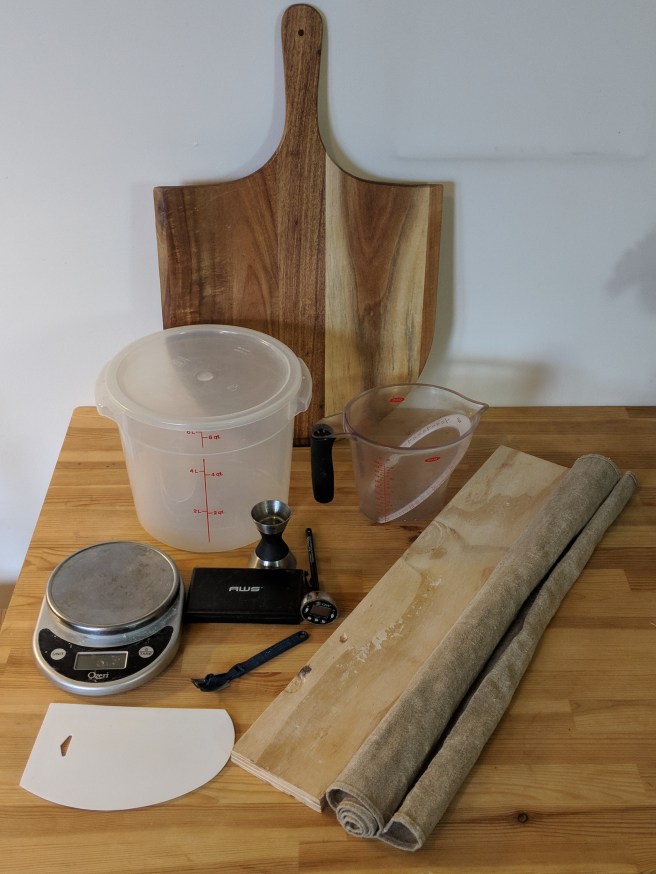
Fermentation tub
This can be any gallon-sized vessel or larger, that can be covered air-tight. If you’re in the market, I strongly recommend round 6qt Cambro food service containers with lids. They’re affordable, transparent, they stack, and they have volume markers on the outside. We get ours cheaply from a local restaurant supply store, but Amazon is happy to help, too.
Thermometer
Your starting dough temperature determines how quickly the dough will ferment. Using a cheap two dollar thermometer to make sure your water is ~80F will give you an easier dough to work with, and consistency between bakes.
Scales
I own two scales: one for 1-5000g (flour and water) and one for .01-100g (yeast and salt). Bread “recipes” are actually called formulas, which express the ingredients’ mass by their percentage of the mass of the flour. Since we’re dealing in ratios of mass, it makes way more sense to measure ingredients’ mass directly than estimate it by hoping you take uniform scoops of flour out of the bag and don’t lose count. The smaller scale is more optional, though especially encouraged if you can think of other uses for it.
Couche/proofing cloth
After shaping baguettes, you let them rest between folds in a flax linen cloth called a couche. This lets the baguettes lose a little moisture on the outside for a flakier crust after baking, as well as let them proof in a light, free shape. You won’t use a couche for anything else (except maybe ciabatta or other shaped breads), but at least it’s only $17. If you’re so inclined, you can also use a similarly sized piece of canvas or sailcloth.
Baguette board/piece of wood
I use a scrap 1×4 from a local hardware store to transfer proofed baguettes from the couche to the peel. I’ll probably upgrade mine soon (wedding registry! woot!) but it really doesn’t matter when you’re first starting. Just make sure it’s long enough to hold a baguette.
Peel and parchment paper
A peel is a large spatula used to transfer bread and pizza to the preheated baking stone. It really just has to be big enough, but even then, my peel isn’t quite long enough for the baguettes I make and it’s still okay. Don’t forget the parchment paper!
Lame/razor blade on a stick
Pronounced lahm, this is the tool you use to score baguettes. Before I bought a specialized tool, I just attached a shaving razor blade to a shortened wooden skewer with JB Weld.
Baking stone/steel
To get a crunchy crust, you need to bake the baguettes on a super preheated slab with high thermal mass. I use a baking stone, but after seeing the baking steel results from Serious Eats, I want it. The stone is much cheaper, though, and totally adequate.
Ingredients
All-purpose flour
I’m always happy with the results I get from King Arthur All-Purpose Flour, but in my neighborhood, a 5lb bag can be $6. That’s enough flour for 18 baguettes, but also expensive enough to chafe a little. Look up the flour you want to buy here, and try to get something around that same 11.7% protein content. Or just get King Arthur AP flour, Heckers flour, or 365 brand AP flour.
Yeast
I haven’t tested yeast brands and controlled for other variables. This is what I use, if you want to follow along. If you want to branch out, try to use instant or bread machine yeast.
Fine kosher salt
The salt should be non-iodized and fine enough to mix in with the flour.
Summary
I use this straight method baguette from the fresh loaf.
- Mix 500g flour, 10g fine kosher salt, and 2g instant yeast by hand. Add 375g ~80-85F water, and stir until combined. Lift out dough and lightly oil the tub with cooking spray, place back and tightly cover with a lid or plastic wrap.
- Over three hours, fold the dough three times, at 45 minute intervals.
- Divide the dough into four equal parts, preshape into logs, and let rest for twenty minutes.
- Shape baguettes and place them in the lightly floured couche.
- Preheat oven to 500F, with a baking stone on the upper middle rack and an oven-safe vessel on the oven floor. Allow the baguettes to proof for 60-90 minutes.
- Transfer baguettes to a parchment-lined peel, score with lame or razor blade, and put them in the oven.
- Lower temperature to 460F, pour a cup of water into the ovenproof vessel, quickly close the oven door, and bake for 10 minutes.
- Check that the baguettes aren’t sticking to each other, and bake for another 15 minutes.
- Turn off the oven and leave the baguettes in for five minutes more. Then let rest on a cooling rack or counter for 15 minutes before cutting them open.


Weigh and combine dry ingredients (500g flour, 2g yeast, 10g salt).


Measure ~80-85F water, tare scale, and slowly add water to dry ingredients until the scale reaches 375g. Combine with a wet hand until the dough is one unified mass, then lift out of tub and spray with oil.
Let the dough sit for 45 minutes, then fold. To fold the dough, lightly lift a corner of the dough from the bottom with a floured or wet hand, and bring it up and over to the opposite corner. Repeat three times, rotating 90 degrees each time, and lifting the dough ball between the third and fourth corners if needed.


Wait 45 minutes and fold twice more, then wait 45 minutes more (for a total of three folds over three hours).


Turn the dough out onto a lightly floured counter. Sprinkle an X on top of the dough, and divide dough into four pieces, weighing and adjusting minimally to equalize mass.
Preshape similarly massed dough lumps into columns, touching lightly and using floured or wet hands.
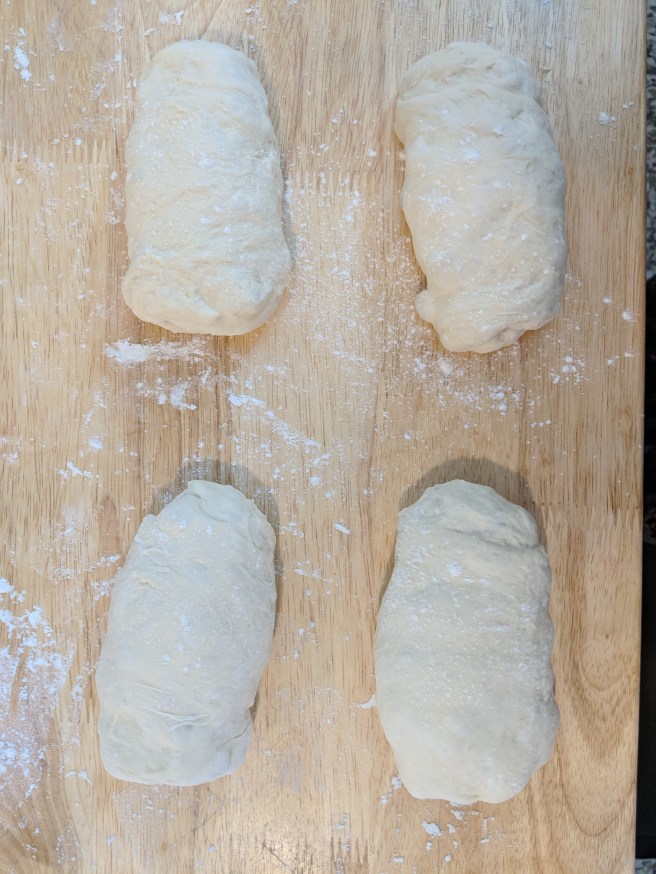
Lightly sprinkle preshaped columns with flour, cover with a clean kitchen cloth, and rest for 20 minutes.
Start by preparing the couche. The goal here is to give the baguettes a soft resting surface that slopes upward. Lay it out flat and lightly flour it, and weigh down one of the short edges of the couche with the baguette board. Pinching from both sides of the cloth with both hands, next to the baguette board on either end, pull some cloth toward the baguette board and slightly up into a small divot.
Shape the baguettes! Working with the counter-resting side up, long side parallel to you, fold the column in half towards you, and lightly press down to seal. Turn the dough 180 degrees and fold in half towards you again. Lightly seal the new seam, then fold down the dough towards you again, using your non-dominant thumb as a guide and sealing the seam as you go with your dominant palm and bottom of your thumb.
Rotate the baguette so the seam side is down, then firmly but gently roll out from the middle with floured hands. Use a little more force on the ends to taper them, then gently transfer the shaped baguette to the floured couche, with the seam side up. Scrunch up the couche on the other side of the baguette, then make the others!


Cover the baguettes with a kitchen cloth. Preheat the oven to 500F with the baking stone on the upper middle rack. Occupy yourself for an hour as you see fit, until the baguettes are nice and puffy.
Using the baguette board, transfer the baguettes to the parchment-covered peel. This has often not gone as gracefully as it went in this video, so if you have to scramble or pick up a dropped baguette, just relax and be as gentle as possible.
Score the baguettes. I’m pretty bad at this, but the general goal is to cut thin, mostly straight fillets over the length of the baguette. This allows the dough to rise in the oven and guides it into a familiar, even shape. But hey – this isn’t about making perfect baguettes. It’s about ANYONE making baguettes!
Pull the oven rack out, line up the end of the baguettes above the back of the pizza stone, and hold down on the parchment paper as you pull away the peel. Put the rack back in, set down the peel, pour about a cup of water into your oven-safe vessel, and quickly close the oven door.
Lower the temperature to 460F, and after 10 minutes, check that the baguettes aren’t sticking to each other. Bake for another 15 minutes, then turn the oven off and leave the baguettes in for another 5 minutes. (YMMV on the actual timing; that’s what works for my oven.)

Do try to wait 15 minutes before cutting into the baguettes; it lets them cook through completely. You’ve made it this far. Don’t mess it up now!

A nice, airy, delicate crumb structure. I can only hope there’s a baguette pedant out there who will eventually scoff at this.

Nothing tastes quite as good as accomplishment. If you have trouble, feel free to reach out – I’d love to help!
